

Thanksgiving Name Cards - Easy DIY Craft
- Nov 21, 2021
- 5 min read
Updated: Nov 25, 2021

[Disclosure: I only recommend products I would use myself and all opinions expressed here are my own. This post may contain affiliate links that are at no additional cost to you, and I may earn a small commission. Thanks for supporting the brands that support this blog.]
Hi ya'll! It's that time of year -- turkey dinner, cranberry sauce, stuffing, and endless amounts of biscuits...am I right?!? It's also that time when large gatherings are the norm, and it's a great excuse to break out that fancy tablecloth you got on the holiday sale last year. With fancy tablecloths come table settings and with table settings, yes, you guessed it, place cards!
Even if you're not fancy enough for place cards, who cares? It's a great excuse to craft, and look at how cute these thanksgiving name cards are? They are relatively easy to make with a few key craft supplies. Prefer watching the YouTube tutorial? Head on over - https://www.youtube.com/watch?v=P0DHRxNBcQ4
Thanksgiving Name Card #1: 3D Pumpkin with Vines

Supplies:
scissors
glue
marker
pencil
ruler
tape
off-white cardstock paper - 6" tall by 4.25" wide
orange cardstock paper - 10" long by 3" wide
bronze/brown paper - 1" square
Optional Supplies:

The first thing you're going to do is cut your off-white cardstock into 6" tall by 4.25" wide. Using a bone folder or just your fingertips, fold the card in half, so that it becomes 3" tall and 4.25" wide. This is your name card base. Then, take your 1" square bronze/brown paper, and accordion fold it into super thin folds. This will be the stem for your pumpkin. This is what your stem should look like now.


Next, take your tape and wrap it around one end of the folded stem to secure the folds together. Place the stem off to the side. Next, take your 2" punch and the orange cardstock. Punch out 4 orange circles. If you don't have a punch, no worries! Just cut out 4 two inch circles from your orange cardstock. Then, fold your circles in half.


Now we are ready to build our pumpkin. Take your first half-circle, and put glue on the flat side. Take the next half-circle and add it on top of the half-circle with the glue. Keep building one half-circle on top of the next until all 4 circles have been glued together.

Now you'll have to work quickly before the glue sets. Take your stem that you made earlier and squeeze it between the 2nd and 3rd folds in your semi-circle. Apply some pressure on the folded half-circles to secure the stem inside. When you open your pumpkin, it should now look like this:


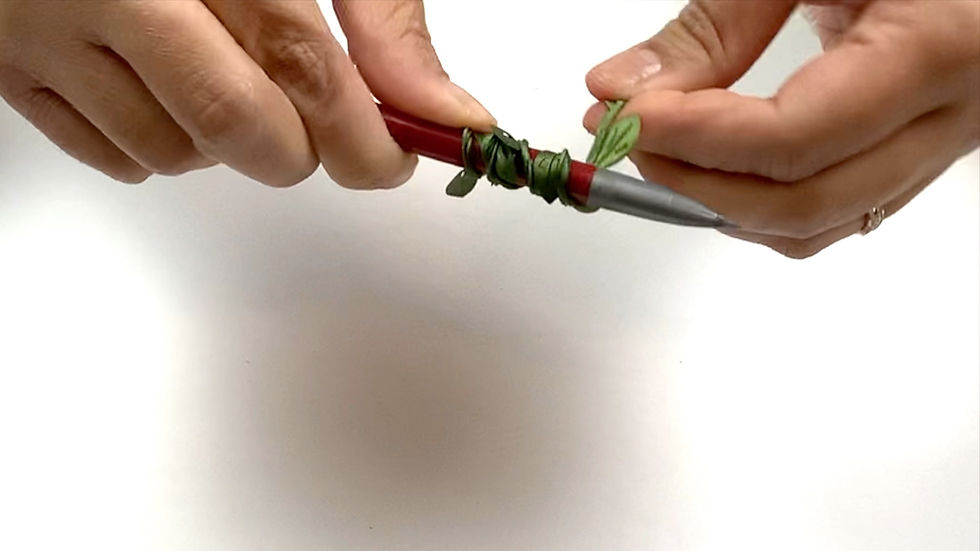
Next, take your wire leaf ribbon and cut 6 inches of it. Take a pen or pencil and wrap your ribbon tightly around it. Pull the ribbon off the pen or pencil, and ensure the coil stays tight.

Find the halfway point in the ribbon and tape it to the back of your pumpkin. Bring the coiled vine in front of both sides of the pumpkin. Once you're happy with the way the vines are placed, take two foam squares and place them on the back of the pumpkin.


Stick the pumpkin to your place card down on one side so you have room to write a name on the side. Apply pressure to the pumpkin to secure it to the card.

Congrats -- you just finished making your Thanksgiving 3D pumpkin place card!

Thanksgiving Name Card #2: Paper Flowers on a Wooden Disc

Supplies:
hot glue gun
marker
shimmer paper (or any paper that will complement your wooden disc and flower colors)
Optional Supplies:

The first thing you will need to do is place your paper flowers (and leaves, if your flower packet came with leaves) in the design that you would like on your wooden disc. If your disc is like mine, there will be a hole (for hanging it as an ornament). I wanted to cover the hole so I placed one of my flowers on top of it. Once I was happy with the design, I took each flower/leaf and placed a few dabs of hot glue on the flattest part to secure it to the disc.

Next, we need to prepare our name tag. This is what happens when you write directly on the wooden oval disc with a marker. Because of the grains of wood, the marker will bleed.

For this reason, you will need to write on your shimmer paper, and then cut that into an oval shape to adhere to the wooden disc. You can certainly cut your paper into an oval by hand, but I had an oval punch, so I used that.

After you have written a name on the paper, add a few foam squares to the back of the oval. This will raise the paper slightly higher than regular glue would, and will give your name card a more 3 dimensional look.

Secure your paper to the oval disc and try to wedge it under the leaves and flowers that you previously hot glued. Since you didn't hot glue each petal down, it should be easy to lift them on the sides and place the paper underneath.

And that's it! You're done with your Paper Flower Place Card!

Thanksgiving Name Card #3: Falling Fall Leaves

Supplies:
leaf punch - this is not the exact one that I used, but any leaf punch will work
glue
marker
pencil
ruler
off-white or tan cardstock paper - 4" by 5"
orange cardstock paper
bronze/brown paper cardstock paper
mustard cardstock paper
green cardstock paper
red cardstock paper
Optional Supplies:
lighter-colored paper for name
darker-colored paper. for frame

The first thing you're going to do is cut your off-white/tan cardstock into 4" tall by 5" wide. Using a bone folder or just your fingertips, fold the card in half, so that it becomes 2" tall and 5" wide. This is your name card base. Next, start punching out a few leaves in every color cardstock.


Now you will place your bottom layer of leaves on your name card. Arrange them in a design that you like, and then secure them to the cardstock with glue.


After that, you can take a few of your remaining leaves, and curl them around a pen/pencil. This will give them a more realistic look. Then, strategically place them on top of your first layer of leaves and secure them with small foam squares.


At this point, you can either:
1) write a name directly on your cardstock with a marker or
2) you can write a name on a separate lighter piece of paper, and then cut a darker piece of paper as your frame for the name. I did the latter, and added large foam squares to the bottom of the lighter piece of paper so that it would be raised.

....and that's it! You've just finished your Falling Leaves Thanksgiving Name Card!


Comments